No products in the cart.


Introduction
A monitor hydraulic mount is one of the best upgrades for any modern workspace. Whether you are working from home, studying, gaming, or managing office tasks, a monitor arm improves comfort, saves desk space, and gives your setup a clean professional look.
Many people want to buy a monitor hydraulic mount but feel unsure about installation. The good news is that installing a monitor arm is usually simple and can be done with basic tools. Most hydraulic monitor mounts come with desk clamps, screws, VESA plates, and adjustment tools.
In this complete guide, we will explain how to install a monitor hydraulic mount step-by-step, including tools required, safety tips, common mistakes to avoid, and adjustment methods.
If you are planning to upgrade your desk setup, you can explore high-quality monitor hydraulic mounts at https://zzmarts.com designed for easy installation, smooth adjustment, and long-term stability.
What Comes in a Monitor Hydraulic Mount Package?


Before starting installation, it is important to understand what usually comes inside the package.
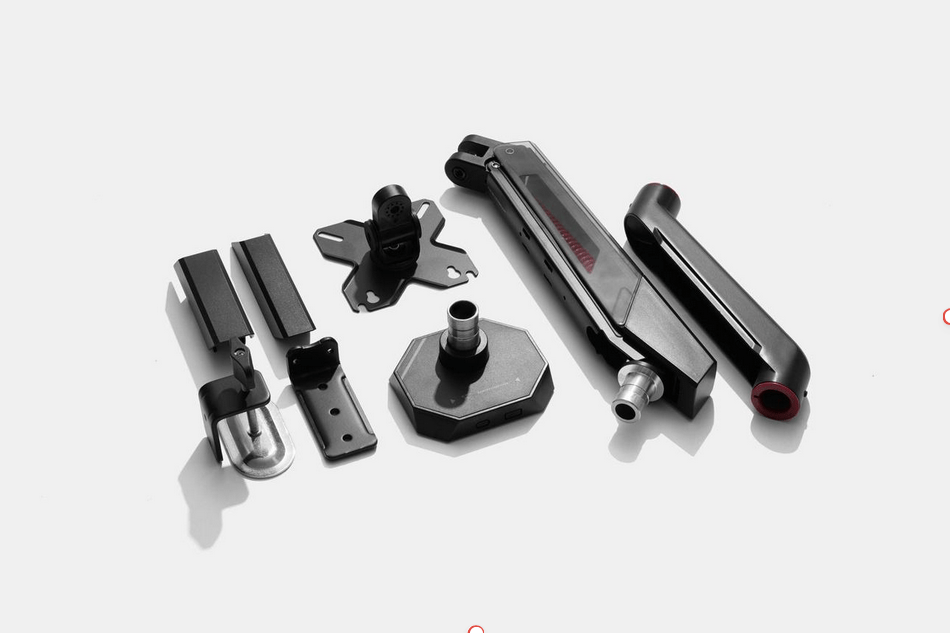
Most monitor hydraulic mount packages include:
- Monitor arm
- Desk clamp
- VESA mounting plate
- Screws
- Allen key
- Cable clips
- User manual
Some models may also include grommet mounting hardware for desks with cable holes.
Understanding each part makes installation easier and faster.
Tools Required for Installation
Installing a monitor hydraulic mount usually does not require many tools.
Common tools include:
- Screwdriver
- Allen key
- Measuring tape
- Soft cloth
- Optional drill machine for grommet mounting
Most packages include the required Allen key.
Make sure all parts are available before starting installation.
Step 1 — Check Monitor Compatibility


Before installing the monitor arm, check whether your monitor is compatible.
Important things to check include:
- Monitor size
- Monitor weight
- VESA mounting holes
- Desk thickness
Most monitor arms support VESA patterns such as:
- 75x75mm
- 100x100mm
If your monitor does not have VESA holes, you may need a VESA adapter.
Checking compatibility prevents installation problems.
Step 2 — Choose the Installation Location

Choose a strong and stable area of your desk for installation.
The best location is usually the back edge of the desk.
Make sure the location allows enough movement for the monitor arm.
Avoid installing the clamp on weak or damaged desk surfaces.
A stable installation point ensures better support and safety.
Step 3 — Attach the Desk Clamp

Most monitor hydraulic mounts use a desk clamp.
Place the clamp on the back edge of your desk.
Tighten the clamp screw until it is secure.
Do not over-tighten, as this may damage the desk surface.
If your desk is thin or delicate, use a protective pad.
A properly tightened clamp keeps the monitor arm stable.
Step 4 — Attach the Monitor Arm to the Clamp
After securing the clamp, insert the monitor arm into the clamp base.
Make sure the arm is fully seated.
Tighten any locking screws if included.
Move the arm slightly to check stability.
The arm should not wobble or feel loose.
Step 5 — Attach the VESA Plate to the Monitor

Place your monitor face down on a soft cloth to avoid scratches.
Attach the VESA plate to the back of the monitor using the provided screws.
Make sure the screws are tight but not over-tightened.
The VESA plate must be firmly attached because it supports the monitor’s weight.
Step 6 — Mount the Monitor onto the Arm

Carefully lift the monitor and attach it to the arm.
Some mounts use a slide-in mechanism, while others require screws.
Make sure the monitor is locked securely into place.
It is better to have another person help during this step, especially if the monitor is large.
After mounting, gently release the monitor to check stability.
Step 7 — Adjust Gas Spring Tension

Gas spring tension adjustment is very important.
If the monitor drops down, tension is too loose.
If the monitor moves upward, tension is too tight.
Use the Allen key to adjust tension slowly.
Test the monitor after each adjustment.
The correct setting allows the monitor to stay at any height without moving.
Step 8 — Adjust Height, Tilt, and Rotation
Once tension is correct, adjust the monitor position.
Set the screen at eye level to improve posture.
Adjust:
- Height
- Tilt
- Swivel
- Rotation
You can also rotate the monitor into portrait mode if needed.
Proper adjustment improves comfort during long working hours.
Step 9 — Organize Cables

Use the built-in cable clips or channels to organize wires.
Route HDMI, DisplayPort, and power cables neatly along the arm.
Leave enough cable slack so the monitor can move freely.
Good cable management creates a clean and professional desk setup.
Common Installation Mistakes to Avoid
Many users make simple mistakes during installation.
Avoid these common errors:
- Not checking monitor weight
- Ignoring VESA compatibility
- Over-tightening desk clamp
- Forgetting tension adjustment
- Poor cable management
Avoiding these mistakes ensures smooth performance.
Safety Tips During Installation
Safety is important when installing monitor arms.
Always support the monitor properly while mounting.
Do not install heavy monitors on weak desks.
Check all screws before use.
If using a large monitor, ask someone to help.
Proper installation prevents accidents.
Why Proper Installation Matters
A correctly installed monitor hydraulic mount provides better stability and comfort.
Poor installation can cause wobbling, sagging, or damage.
Taking time to install the mount properly ensures long-term performance.
If you want a strong and reliable monitor hydraulic mount for your workspace, visit https://zzmarts.com to explore durable options suitable for office, gaming, and home setups.
Tools Needed to Install Monitor Hydraulic Mount
- Screwdriver set (usually included with the arm)
- Tape measure to confirm desk thickness and clearance
- Your monitor’s VESA screws (some monitors ship with longer replacement screws for this purpose)
Frequently Asked Questions
How long does it take to install monitor hydraulic mount?
Most installations take 15-30 minutes once you have confirmed your monitor’s VESA pattern and desk clearance.
Why is my newly installed arm sagging?
This is a tension adjustment issue, not an installation mistake – locate the tension screw on the arm joint and tighten it to match your monitor’s weight.
Can I install a monitor hydraulic mount without drilling my desk?
Yes – clamp mounts require no drilling and attach directly to the desk edge, as long as your desk thickness falls within the clamp’s supported range.
ZZ Marts sells monitor hydraulic mounts and arms in Karachi and Lahore, and our staff can help confirm compatibility before you buy. Visit our Saddar Regal (Karachi) or Mashallah Center (Lahore) store, or browse online.
Conclusion
Installing a monitor hydraulic mount is a simple and effective way to improve your workspace. With the right tools and proper steps, you can easily mount your monitor, adjust it to the perfect height, and create a cleaner desk setup.
A properly installed monitor arm improves posture, saves desk space, and increases productivity.
Whether you are working, studying, or gaming, a monitor hydraulic mount is a smart upgrade for long-term comfort.
Ready to upgrade your desk setup? Visit https://zzmarts.com today and discover high-quality monitor hydraulic mounts designed for smooth adjustment and professional workspace comfort.